
Process Builder - Part 3 (Automatically Clone a Record if it Meets Certain Criteria)
Business Use case
Steve Cartwright is working as a System administrator at Universal Containers (UC). He has received a requirement to auto create a new Opportunity (Similar to an old record) whenever an Opportunity is successfully closed and set the Close date for new Opportunity to 120 days from old opportunity’s close date.

Solution for the above business requirement


Business Use case
Steve Cartwright is working as a System administrator at Universal Containers (UC). He has received a requirement to auto create a new Opportunity (Similar to an old record) whenever an Opportunity is successfully closed and set the Close date for new Opportunity to 120 days from old opportunity’s close date.
Solution for the above business requirement
There are multiple solutions possible for the above business scenario. You can either use Apex trigger, a combination of Flow and Process Builder, and few more. We will use Process Builder to solve the above business requirement. This is just one level cloning, if you want to implement deep clone (Multilevel cloning) then you have to use Flow or Apex code. This article will help you to understand the way to clone a record using Process Builder and concept to use dynamic date in the Process Builder. Follow the below instructions to create a Process for the above business requirement
1. Unlike Workflow rule, Process builder doesn’t allow you to use dynamic date on a field update (i.e. Update Records action). For this we have to create a custom formula field 120 After RCD on Opportunity object as shown in the following screenshot

CLOSE DATE FOR NEW OPPORTUNITY
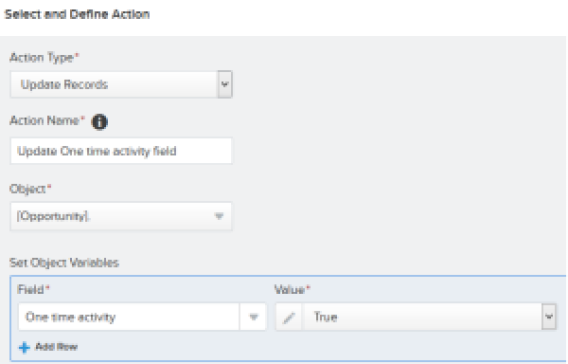
2. Also creates a check-box field One time activity (Default value: – Unchecked), so that Process will fire only once, after successful closure of an Opportunity.
3. To create a Process click on Name | Setup | App Setup | Create | Workflows & Approvals | Process Builder. Click on the New Button available on Process Management page, A popup will open where you have to enter a Name (Enter Clone an opportunity as name), API Name and Description as shown in the below screenshot
3. To create a Process click on Name | Setup | App Setup | Create | Workflows & Approvals | Process Builder. Click on the New Button available on Process Management page, A popup will open where you have to enter a Name (Enter Clone an opportunity as name), API Name and Description as shown in the below screenshot

DEFINE PROCESS PROPERTIES
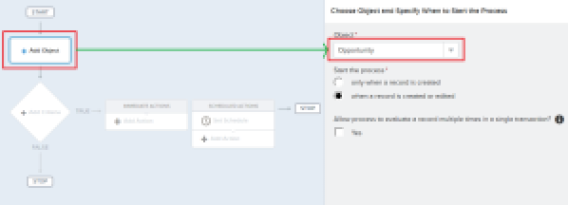
5. Once you click on the Save button, it will redirect you to Process canvas. Click on Object node to add object, Select Opportunity object, in this case and set the evaluation criteria, Please refer to the following screenshot for more details

EVALUATION CRITERIA
6. The next step is to define the Process Criteria. For this click on Add Criteria node, Enter Criteria Name, Set filter conditions (Similar to Rule Criteria in WFR), as shown in the following screenshot

PROCESS CRITERIA
7. Now we have to add an immediate action into the Process to create an opportunity record. For this use Create a Record action, Please refer to the following screenshot for more details

ADD ACTION – CREATE A RECORD
Make sure that you have assigned data in the correct format, because Process builder obey Validation rule. If some fields are required by using Validation rule, then make sure that you have added those fields. Same time if some fields are required using Page layout, you can ignore those fields.
8. Next step is to update the One time activity field to True, so Process will not fire if a user is trying to update the Closed Opportunity. For this use Update Records action, Please refer to the following screenshot for more details

ADD ACTION – UPDATE RECORDS
9. Final task is to activate your Process by clicking on the Activate button.
Now onwards if the user will update the Opportunity stage to Closed won, Process builder will automatically create a new Opportunity.
original source :- https://automationchampion.com/