
Salesforce Winter 22 (Wi22) Exams Start From 9TH December 2021
Currently, the Winter’22 release is available under the pre-release program. On the and 27th of August, Sandboxes will be upgraded, as a result, your organization will get the look and feel of the Winter’22 release. In this release, you will find lots of new features, as well as, new enhancements related to Lightning Experience, Salesforce Flow, Lightning Web Component, Apex, Experience Cloud, Field Service, Pardot, Quip, Tableau CRM, myTrailhead and APIs.

For example, features like Bring Dynamic Interactions to Your Dynamic Actions Bar (Pilot), Make Cross-Cloud Connections with the Marketing Cloud Form Component (Pilot), Make Custom Screen Components React to Other Components on the Same Flow Screen (Pilot), Take Control of Which Objects Users See in Search (Beta), Update More Fields from the Report Run Page with Expanded Inline Editing (Beta), and Draw Insights on Salesforce CDP Data (Beta) is now available in Lightning Experience.
Also, check out these beta and pilot features:
- Bring Dynamic Interactions to Your Dynamic Actions Bar (Pilot): – Now you can update multiple components on your app page with one click of a button in your Dynamic Actions Bar. An admin can use the Dynamic Actions Bar component to create Dynamic Interactions, which trigger other components to update and transform based on user interactions.

- Add an interaction to your Dynamic Actions Bar just like you would add an action. When you select the Dynamic Actions Bar component on your app page, click Add Interaction in the properties pane. After you name the button, you can choose your interaction type and configure it in the pane.
- For example, say you want to configure your new button, Show Cases, to update the List View component to show cases instead of accounts.
- You want the button to update a component, so in the Interaction picker (1), under Components, select Update Properties. Then, specify the Component this interaction updates, List View (2). Choose the Object (3) and Filter (4) for your List View as Case and All Open Cases.
- Now, when your users click Show Cases in the Dynamic Actions Bar, the List View changes to show open cases.
- Send List Email Your Way (Pilot): – Now your sales reps can choose how to send their list emails. Now, reps can send list emails through Gmail, Office 365, or Microsoft Exchange. Previously, reps could send list emails via Salesforce only.

- For Gmail and Office 365, from Setup, in the Quick Find box, enter Send through External Email Services, and then select Send through External Email Services.
- Assist Your Agents and Customers to Find Knowledge Articles (Pilot): – Einstein Search for Knowledge is now powered by AI to get service agents and customers the most relevant knowledge articles. Try it by signing up for the Einstein Search for Knowledge pilot.

- Automatically Tune Your Dashboards to Your Business Goals with Dynamic Gauge Charts (Beta): – Dashboard gauge charts are awesome to track your performance and business goals, but your business is always changing. With dynamic gauge charts, you’re no longer tied to static goals or performance levels. Build your gauge chart using report metrics and field values that respond dynamically to your business. For example, a gauge chart can show how a subsidiary’s sales are doing relative to your overall business.

- From Setup in Lightning Experience, in the Quick Find box, enter Reports and Dashboards, and then select Reports and Dashboards Settings. Select Enable Dashboard Dynamic Gauge Charts (Lightning Experience only), and save your changes. Next, make sure that your source report is set up for the data that you want to chart. Now, pop over to the dashboard builder for your new or existing dashboard and add the gauge chart component
 .
.
- From Setup in Lightning Experience, in the Quick Find box, enter Reports and Dashboards, and then select Reports and Dashboards Settings. Select Enable Dashboard Dynamic Gauge Charts (Lightning Experience only), and save your changes. Next, make sure that your source report is set up for the data that you want to chart. Now, pop over to the dashboard builder for your new or existing dashboard and add the gauge chart component
- Customize Button Labels in the Flow Screen Footer (Beta): – In Flow Builder, you can now easily customize the Previous, Pause, Next, and Finish button label text. With customized screen navigation options, you can let a user know what to expect when the user clicks the button. Previously, to customize the footer labels, you built a custom component.

- Draw Insights on Salesforce CDP Data Using Tableau CRM (Beta): – Use Salesforce CDP data in Tableau to run deep explorations on your unified customer data source without loading data or preparing it in Tableau CRM first. After setting up a live connection to Salesforce CDP, you can run queries on Salesforce CDP data associated with the connection in real time. You can also build dashboard charts and tables based on the queries that you run on this data.
- Send Slack Notifications to Pardot Users with Completion Actions (Beta): – Speed up your pipeline with a completion action that notifies your team in Slack when prospects interact with your marketing assets. Automatically send promising new leads to your Sales team, and share important prospect activity data with your Marketing team.

- Use Flow Orchestrator Work Guide to Connect Users with Tasks (Beta): – The new Flow Orchestrator Work Guide (Beta) component displays actions generated by Flow Orchestrator orchestrations to assigned users.


Supported Browsers for Lightning Experience
Lightning Experience is supported by Apple® Safari® latest version on macOS. The most recent stable versions of Microsoft® Edge Chromium, Mozilla® Firefox®, and Google Chrome™ are also supported.
Supported Browsers for Salesforce Classic
Salesforce Classic is supported with Microsoft® Internet Explorer® 11 version, Apple® Safari® latest version on macOS. The most recent stable versions of Microsoft® Edge Chromium, Firefox®, and Google Chrome™ are also supported.

Customers/Administrators Point of View
- Show In-App Guidance for Specific Record Types: – Now, you can choose if you want in-app guidance to appear for all or only a specific record type. And you can customize your message so that users get detailed help for the unique layout and picklists of different record types. Previously, when you created in-app guidance and assigned it to a record page with multiple record types, the in-app guidance appeared for all of its record types.

- From Setup in Lightning Experience, in the Quick Find box, enter In-App Guidance, and then select In-App Guidance. When you add or edit in-app guidance that has more than one record type and you want the prompt to appear only for a specific record type, select the checkbox in the Record Type area.
- Save Time by Creating Custom Pipeline Views and Filters: – Sales managers and reps can save their most frequently used pipeline views to avoid recreating them each time they visit Pipeline Inspection. For example, create custom filters for new business, teams, time periods, product types, and more.

- To create pipeline view:
- Use the List View Controls menu under the gear icon
- To create, clone, or delete pipeline views. Add filters to view the opportunities that meet your filter criteria. Using the filter panel
- You can add time period and user filters. And you can add even more criteria such as accounts, amounts, and record types.
- To create pipeline view:
- Add Rows and Columns to Your Email Templates: – Now you can use the Layout component to easily add a row to your Email Template Builder or Email Content Builder template. Select a layout with no columns or a preconfigured set of up to four columns. This component replaces the Row component.

- In Email Template Builder, select a column layout and drag it to the canvas. Then add components to the columns.
- Hold Sales Reps Accountable for Updating Opportunity Next Steps: – To help keep sales reps focused on moving opportunities forward, sales managers can now see when opportunity next steps aren’t updated. An indicator shows when the last update to the Next Step field was more than 7 days ago. Hovering on the Next Step field shows details on the last update.

- Include Images in Rich Text Fields in the Lightning App Builder: – Increase the usability of the Rich Text components on your Lightning pages by adding images.

- Build Landing Pages Faster with Drag-And-Drop Editor: – If you’re using the Pardot Lightning App, you can now build landing pages inside the Lightning Experience. After you enable the feature, users can create a landing page record in a couple of clicks. Plus, stay on brand by encouraging users to start from saved templates and to select approved images from your Salesforce CMS repository.
- The landing page builder becomes available when you enable the new Pardot content experience and Salesforce CMS integration.

- After setup, users can create landing page records, design landing pages, and publish them right from the Pardot Lightning App. Salesforce Files aren’t supported in the builder, so we encourage you to follow the setup steps to integrate with Salesforce CMS.

- The landing page builder becomes available when you enable the new Pardot content experience and Salesforce CMS integration.
- Push Emails from Lightning Experience into Engagement Programs : – When you create emails in the drag-and-drop editor in Lightning Experience, you can now save them for use in Engagement Studio. Create your email content and activate it for use in automations.
- Enable the email experience on the Content Setup page in Marketing Setup. The next time a user with the appropriate permission creates or opens an email content record, Activate for Automation appears in the action menu.

- Enable the email experience on the Content Setup page in Marketing Setup. The next time a user with the appropriate permission creates or opens an email content record, Activate for Automation appears in the action menu.
- View IP Address for Prospect Activities in Pardot: – To better understand your engagement data, you can view the IP address associated with most prospect activities on prospect records in Pardot. You can use this additional insight to create more effective visitor activity filters. For example, if you notice a lot of test clicks coming from a single IP, you can filter out that activity based on the IP.

- Make Resource Planning Easier with Enhanced Shift Patterns and Templates : – Create multiple shifts for multiple resources and eliminate repetitive scheduling. Quickly create shifts from patterns with a shift template in Experience Builder (formerly Communities). Easily add recordset filter criteria to shifts by adding it to the shift templates.

- Take the Guesswork Out of Scheduling Shifts in Different Time Zones: – Use the time zone toggle to accurately view shifts instead of calculating time zones on your own.

- Create resource schedules, then to view a schedule in the resource’s time zone, turn on Territory Time Zone (1). Toggle it off to see the schedule in the shift manager’s time zone.
- Expand Remote Video Capabilities for Mobile Workers with the Visual Remote Assistant Mobile App: – Provide mobile workers with professional video capabilities to enhance the visual quality during a video session. Benefit from using camera features, such as Exposure, Focus, Zoom, and Flashlight, with the Visual Remote Assistant mobile app.
- Relate Multiple Financial Deals to Interactions and Interaction Summaries :– You can now create one interaction or interaction summary to track details of multiple financial deals. Adopt the enhanced Financial Deal data model that supports many-to-many relationships between financial deals and interaction summaries, and financial deals and interactions.
- To adopt the data model that supports many-to-many relationships, from Setup in Lightning Experience, in the Quick Find box, enter Deal Management, and then select Deal Management, and then select Deal Management Settings. Enable Use Many-to-Many Relationships.

- To adopt the data model that supports many-to-many relationships, from Setup in Lightning Experience, in the Quick Find box, enter Deal Management, and then select Deal Management, and then select Deal Management Settings. Enable Use Many-to-Many Relationships.
- Record Association Builder Supports More Financial Services Cloud Objects : – Create automatic associations for any custom object that you care about using Record Association Builder’s declarative and programmatic mapping features. Record Association Builder now supports custom objects and lets you specify customized logic for creating associations and related data in response to record creation and update events.
- To automatically create associations in response to custom object events, select the custom object in the Reference Object dropdown on the Association Criteria page and specify the event type. Then add a precondition formula to determine when a custom object event results in a new association.

- By default, Record Association Builder uses the Owner ID field in the custom object record to determine which Branch Unit to associate the record with. The association uses the current branch unit assignment for the user or contact that’s specified in the Owner ID field. You can choose to associate the records based on a different field, such as Created By Id or Last Modified Id. To change the default, select Use an alternate owner ID and then select an alternate ID field on the custom object.

- To automatically create associations in response to custom object events, select the custom object in the Reference Object dropdown on the Association Criteria page and specify the event type. Then add a precondition formula to determine when a custom object event results in a new association.
- Deliver Learning Content for Specific Audiences: – Support the unique learning and enablement requirements of your user groups. With content permissions in myTrailhead, you can create multiple content collections, which are groups of myTrailhead content that you can make available to specified users. Only learners with permission to access a particular content collection can view and complete the content included in the collection.

- Diagnose, Track, and Prevent Service Interruptions with Incident Management: – Get ready for a service team that manages interruptions like superheroes! When a widespread incident occurs, use Incident Management to analyze the cause, streamline agent operations, and minimize downtime. Plus, change management features help get meaningful changes implemented to prevent incidents from reoccurring.
- Incident management helps your escalation teams track large-scale disruptions and delegate tasks to the right agent for the job to ensure your company delivers on customer expectations. They can log a problem to find the root cause of a service interruption or other major productivity blocker. And the change manager gives escalation specialists a way to take the steps necessary to ensure the problem is never an issue for your org again.
- Give Agents More Context with a Customized Screen Pop): – Personalize service by providing the agent with more information about the conversation. With screen pop, automatically open up to three records on the agent’s screen when a voice call, message, or chat is routed to the agent. For example, you can show the customer’s contact, case, and order records on separate subtabs, along with the primary work record.

- Find Out Which Email Templates and Call Scripts Perform Best with Variant Testing: – Sales managers can use sales cadence steps to test different email templates or a call scripts to see which is most effective with prospects. The sales cadence sends each email or displays each call script according to the proportions that managers choose when building the sales cadence.

- Streamline Your Partner Telephony Contact Center Setup (Prescriptive Setup): – Connect your existing contact center to your partner telephony accounts in fewer steps. After you install your partner telephony provider’s managed package from AppExchange, use clicks and not code to streamline your setup and share information across accounts. To cut down on repetitive tasks, users are also synced across your Salesforce contact center and your partner telephony account.
- Filter Smarter with Custom Filter Logic: – When using Tableau CRM you get more granular with data prep recipe filters to include only the rows you want. Define custom filter logic with parentheses and the AND, OR, and NOT Boolean operators, such as (1 AND 2) OR 3. Previously, you filtered data that met all specified conditions. For example, now you can focus on accounts with contracts expiring this year that are currently high value, or low value but with many employees.

- Send Sales Cadence Automated Emails as List Emails to Save Data: – Sales cadence automated email steps now send the message as a list email. With this change your sales managers can send large batches of automated emails without accumulating unneeded data that counts against your data limits. This change also allows more detailed email error reporting.


Additional enhancements worth noting!
- See How Many Times Close Dates Are Pushed Out: – With the Push Count field, your sales teams can get important information about deal health. The Push Count field shows the number of times an opportunity’s close date is pushed out by a calendar month.
- Add and Remove Permission Set License Assignments Faster: – Save time by assigning multiple users to a permission set license together or by removing multiple users all at once. On each permission set license detail page, you can select multiple users to complete bulk assignment operations. Previously, you added or removed users individually from each user’s detail page.
- From Setup in Lightning Experience, in the Quick Find box, enter Company Information, and then select Company Information. Scroll down to the permission set licenses related list, and click the name of the permission set license that you want to assign users to or remove users from.
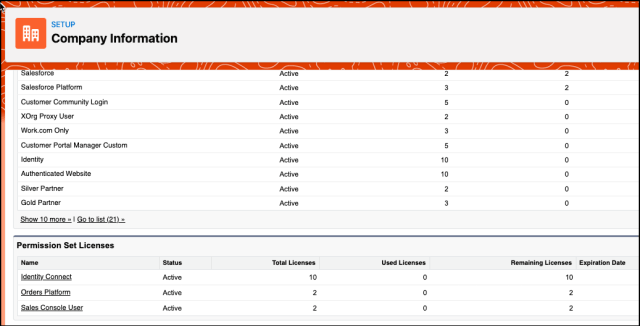
- To see and remove current assignments, click View Users. To assign users, click Assign Users.
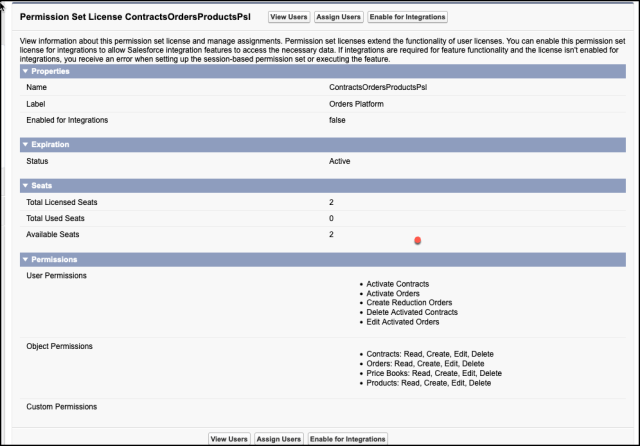
- From Setup in Lightning Experience, in the Quick Find box, enter Company Information, and then select Company Information. Scroll down to the permission set licenses related list, and click the name of the permission set license that you want to assign users to or remove users from.
- Grant Access Based on Activated User Sessions for Permission Set Groups: – Now you can grant your users only the access that they need when they need it, combine the management power of permission set groups with session-based access control. Create a session-based permission set group to grant access to permission sets during an activated user session. Previously, you created individual session-based permission sets, but now you can set sessions at the permission set group level as well.

- Manage Assignment Expiration in Permission Sets and Permission Set Groups (Beta): – You can now view and update current assignment expirations for your permission sets and your permission set groups. Previously, to update assignment expirations, you recreated them with the correct expiration date.
- See Which Deals Are Unlikely to Close This Month with Einstein Deal Insights : – Einstein Deal Insights predicts when opportunities scheduled to close this month are unlikely to be won during the same month. With this new insight, sales managers and their teams can forecast more accurately and maintain more accurate pipelines. To get details about a prediction, hover over the opportunity close date field.

- Output Your Tableau CRM Data to Amazon S3 (Generally Available) : – Output connectors now let you push your data from Tableau CRM into Amazon S3 when you use Data Prep. You designed powerful recipes that combine data from multiple sources, add formula fields, and transform data into datasets tailored to your business needs. With output connectors and Data Prep, datasets are liberated from Tableau CRM and written as one or more .csv files for you to improve your overall business processes with better data. For example, output processed and transformed customer service data for individual agents to understand what they could be doing to improve customer satisfaction.

- Import Snowflake Data to Apps Using Live Datasets in Templates: – The Tableau CRM template framework now supports the Snowflake Direct Connector. Templated apps with Snowflake connectors import live data from Snowflake. These templated apps provide real-time metrics in dashboards and lenses using queries based on the Snowflake data.
- Build Complex, Maintainable Queries with Subqueries: – Sometimes, your queries have a lot to say: join these datasets, filter on a subset, then operate on a further subdivision. Streamline your SQL queries with subqueries to isolate and nest each part of a statement. By using subqueries, your query is easier to read and maintain in the long run. This change applies to Tableau CRM.
- Reset Bounce Counts on Prospect Records : – Users with the Pardot Administrator or Marketing user roles can now reset the count for hard or soft bounces on prospect records when bounce issues are resolved. When bounce counts are reset, the prospect becomes eligible to receive emails. If the next email sent to that address returns either a hard or soft bounce, the prospect is marked Undeliverable again.
- Customize Prospect Unsubscribe and Resubscribe Page Content : – Your marketing team can now control all the messaging that appears on Pardot unsubscribe and resubscribe pages. Customizable fields now include the unsubscribe prompt, plus button text and confirmation messages for the unsubscribe and resubscribe pages.
- Bring Your Own Encryption Keys to Pardot : – Bring and manage your own encryption keys to protect your Pardot data. Use Bring Your Own Key for Encryption at Rest to add a layer of security to your Pardot account, and to quickly destroy your data in a compliance emergency.
- Disable Ref ID and Transition to New Email Threading Behavior (Release Update): – Salesforce now match email headers to their corresponding cases. With the new threading behavior, new outbound emails don’t contain a Ref ID. This update was first made available in Winter’21.
- This update was first available in Winter’21 and is enforced in Summer’22. This update was originally scheduled to be enforced in Winter ’22 but was postponed.
- Improve the Agent Experience with Search-Based Transfers and a Caller ID Tool: – A few new tools make it easier to transfer calls and identify callers. Agents trying to transfer a call to another team member can search for an agent, queue, or phone number, or scroll through a list of agents to see who’s available. And when a customer dials in, use the caller phone number to create an End User record so that agents always know who’s calling.
- Give Users Access to Work Plans on Their Experience Builder Site: – Make the Work Plans Lightning web component accessible to users on their Experience Builder site so that they can view and complete assignments more quickly and with less guesswork.
- Fine-Tune Your LWR Sites with New Branding Properties: – Customize the size and shape of the buttons and input fields on your LWR site. Specify the color of individual elements, such as headings, body text, links, buttons, and input fields. On the reorganized Site Spacing tab, you can more easily adjust the space above, below, and between section components on your desktop and mobile sites.
- The Theme panel in Experience Builder includes new selections for adjusting the branding properties of the buttons and forms on your site.

- For buttons, adjust the appearance and size of the button text. You can also modify the width, font size, and edges of standard, small, and large buttons.

- For forms, adjust how rounded the corners of your input fields are, and how heavy the border is around these fields.

- The Theme panel in Experience Builder includes new selections for adjusting the branding properties of the buttons and forms on your site.
- Set the Default Language in LWR Sites: – Now you can set your LWR site’s default language to any language that Experience Cloud supports. Previously, LWR sites supported only English (US).

- Increase Security for Interaction Summaries and Financial Deals with Shield Platform Encryption: – Use Shield Platform Encryption to add another layer of protection to client and partner interactions and deal-related information. Now you can encrypt fields on Interaction, Interaction Summary, Financial Deal, Interaction Summary Discussed Account, Financial Deal Interaction Summary, and Financial Deal Interaction objects.
- Streamline Identity Verification with Built-In Authenticators (Beta): – With new support for biometric methods, verifying your identity in Salesforce just got even easier. Users can register biometric built-in authenticators, such as Touch ID, Face ID, and Windows Hello. Anytime users are challenged to verify their identity, including multi-factor authentication and device activations, they’re prompted to use their built-in authenticator. There are a few great reasons to let your users verify their identity with built-in authenticators.
- They’re convenient. Users can breeze through identity verification without needing a second device, such as a security key or a mobile device with an authenticator app.
- They’re secure. Built-in authenticators are based on the FIDO2 Web Authentication (WebAuthn) Platform standard, making them extra resistant to security threats, like phishing.
- They ensure privacy. The user’s biometric data never leaves their device.
- Collaborate Better on Action Plans Even Offline : – Now you can enable your users to print tasks and document checklist items related to action plans using the enhanced printable view.

- Say More in a Lightning Email Template’s Subject: – Engage your readers with a longer, more descriptive subject line. The Subject field in Lightning email templates, including email templates created in Email Template Builder, can now be up to 1,000 characters long. Previously, the limit was 230 characters.
- Select New Time Zones: – To improve accuracy, to enhance integration with external systems, and to support your users wherever they work, users can now select from 430 time zones. With this change, Salesforce supports all time zones in the latest Time Zone Database version, 2021a.


Developers Point of View
- Secure Your Components Better, Stronger, Faster with Lightning Web Security (Beta): – The Lightning Component framework introduces Lightning Web Security, a new client-side security architecture for your custom Lightning web components. This new architecture is defined by fewer restrictions and more functionality while providing strong sandboxing and a security posture to mitigate the most common UI attacks. The result is strong, flexible, usable security for your Lightning web components.The new Lightning Web Security architecture is positioned to replace Lightning Locker for Lightning web components. It works along with Lightning Locker, which is still used for Aura components.Like Lightning Locker, the new security architecture blocks or modifies behavior of APIs that aren’t secure. In addition, the new architecture supports features that Lightning Locker doesn’t.
- Cross-namespace component use:- Your LWC components can import components or modules from other namespaces and use them via composition or extension. Components are isolated in their own namespace JavaScript sandbox, but it’s transparent to you because the security architecture performs virtual communication behind the scenes.
- Interactions with global objects:- Because each namespace is given its own detached JavaScript sandbox, we can expose document, window, and element global objects directly without secure wrappers. Changes made to the global objects in your namespace can’t affect other components.
- Improved performance:- Execution of your code in the namespace JavaScript sandbox is faster than in Lightning Locker.
- Better support of third-party JavaScript:- Libraries can use techniques such as manipulating global objects while running in a JavaScript sandbox. In Lightning Locker, such behaviors prevented use of some third-party libraries.
- Compatibility with standard JavaScript as it evolves:- The JavaScript sandbox technology is built on standards. The new security architecture doesn’t need frequent updates to keep pace as new APIs are added. From Setup in Lightning Experience, in the Quick Find box, enter Session, and then select Session Setting. On the Session Settings page, select Next generation Lightning UI Security for LWC.

- Build More Interactive Lightning Pages with Dynamic Interactions: – Now you can create applications with components that communicate and transform based on user interactions, all in the Lightning App Builder UI. With Dynamic Interactions, an event occurring in one component on a Lightning page, such as the user clicking an item in a list view, can update other components on the page. To get the most out of Dynamic Interactions, admins and developers work together.
- Developers write custom Lightning web components that power the dynamic interactions. The developer defines the events that are supported by a component and then exposes them in the Lightning App Builder. Then for each event, admins can create interactions between the source and target components using a new Dynamic Interactions UI in the Lightning App Builder properties pane.

- If a component has events exposed for it, its properties pane has two tabs. The Properties tab contains the component properties that you’re familiar with. The Interactions tab is new for Dynamic Interactions. It lists all of the events that the developer exposed for the selected component and any interactions that have been configured for each event.
- Developers write custom Lightning web components that power the dynamic interactions. The developer defines the events that are supported by a component and then exposes them in the Lightning App Builder. Then for each event, admins can create interactions between the source and target components using a new Dynamic Interactions UI in the Lightning App Builder properties pane.
- Expose Events in the Lightning App Builder: – As part of Dynamic Interactions, you can now define the events for a Lightning web component on a page, and then expose those events in the Lightning App Builder. An admin can then configure the event by setting up interactions between the source component and its targets right in the App Builder UI.
- To expose an event from a component, you fire a standard JavaScript CustomEvent in its .js file. To make the event discoverable, use the Dynamic Interactions-related targetConfig subtags in the component js-meta.xml file with the target lightning__AppPage.
- event
- Exposes the event for Dynamic Interactions and make it available for the component in the Lightning App Builder. The event subtag supports the name, label, and description attributes.
- name—The name of the event as defined in the component’s .js file. If no label attribute is defined, the name value is shown in the list of available events for the component in the Lightning App Builder.
- label—The admin-friendly label for the event.
- description—The description of the event, which displays in an i-bubble on the event label in the Lightning App Builder.
- Exposes the event for Dynamic Interactions and make it available for the component in the Lightning App Builder. The event subtag supports the name, label, and description attributes.
- schema
- Provides the shape of the event. Content in the schema subtag must be in JSON format.
Here’s a sample js-meta.xml configuration file for a custom Account List source component. It includes an itemselected event, and its schema includes apiName and recordId as defined in the .js file.
<?xml version="1.0" encoding="UTF-8"?> <LightningComponentBundle xmlns="http://soap.sforce.com/2006/04/metadata"> <apiVersion>53.0</apiVersion> <isExposed>true</isExposed> <masterLabel>Account List</masterLabel> <targets> <target>lightning__AppPage</target> </targets> <targetConfigs> <targetConfig targets="lightning__AppPage"> <property name="apiName" type="String"/> <property name="listViewApiName" type="String"/> <event name="itemselected" label="Item Selected" description="This event fires when an item is selected."> <schema> { "type": "object", "properties": { "recordId": { "type": "string", "title": "Record ID" "description": "Enter an 18-digit record ID." }, "apiName": { "type": "string" } } } </schema> </event> </targetConfig> </targetConfigs> <description>Defines an event for an Account List component</description> </LightningComponentBundle> - Create Custom Components for the Email Content Builder: – You can now create custom email components to use in Pardot’s drag-and-drop builder. Custom components help marketers and managers create more engaging email content for their customers.
- To configure a custom component to use in the Pardot email experience, define the metadata in <component>.js-meta.xml. Define a lightning__StaticEmail target and set <isExposed> to true.
<?xml version="1.0" encoding="UTF-8"?>
<LightningComponentBundle xmlns="http://soap.sforce.com/2006/04/metadata">
<apiVersion>53.0</apiVersion>
<isExposed>true</isExposed>
<targets>
<target>lightning__AppPage</target>
<target>lightningStatic__Email</target>
<target>lightning__HomePage</target>
</targets>
</LightningComponentBundle>
- To configure a custom component to use in the Pardot email experience, define the metadata in <component>.js-meta.xml. Define a lightning__StaticEmail target and set <isExposed> to true.
- Add User-Authorized Cookie Consent to Your Lightning Web Components: – Use the lightning/userConsentCookie module to incorporate user-authorized cookie consent into your components. Users can allow one or more specific cookie types: Required, Marketing, Preference, and Statistics.
- In Experience Builder on the Security & Privacy tab, turn on Allow only required cookies for this site. Your code can then give users the ability to fine-tune consent for the cookie types that they do and don’t want to permit.Import the userConsentCookie component method inside your custom component.
import{
    setCookieConsent,
    isCategoryAllowedForCurrentConsent,
} from 'lightning/userConsentCookie';
Use setCookieConsent() to set consent preferences for one or more cookie categories.
var consent = {
    "Preferences" : true,
    "Statistics" : true,
    "Marketing" : false
}
Sfdc.Cookie.setCookieConsent(consent);
- In Experience Builder on the Security & Privacy tab, turn on Allow only required cookies for this site. Your code can then give users the ability to fine-tune consent for the cookie types that they do and don’t want to permit.Import the userConsentCookie component method inside your custom component.
- Control the Default Records Your Users See with Scoping Rules (Beta): – Reduce noise and unnecessary searches while enhancing your users’ productivity. Based on criteria that you select, you can set rules to help your users see only records that are relevant to them. By adding a scoping rule, you can help users focus on pertinent records and prevent them from accessing records containing sensitive or inessential information. Scoping rules don’t restrict the record access that your users already have. Your users can still open and report on all records that they have access to per your org’s sharing settings. For information on enabling this feature, contact Salesforce.
- Let Org-Specific Metrics Guide Your Lightning Page Performance Improvement): – Various factors can affect your Lightning page’s performance at runtime. Performance Analysis for App Builder gives you recommendations to improve your page performance. Now you can see your users’ performance metrics to help you decide which recommendations to take or to defer. Data from the last 90 days of use is analyzed and displayed in your Org-Specific Metrics card results. This analysis includes your users’ network latency, browser speed, and number of cores.
- To view org-specific metrics, click Analyze from the Lightning App Builder toolbar, if it has not run automatically.

- To view org-specific metrics, click Analyze from the Lightning App Builder toolbar, if it has not run automatically.
- Attach Actions to Asynchronous Apex Jobs Using Transaction Finalizers (Generally Available): – Improve Page Performance with More Custom Lightning Component Analysis.
- To help you improve page performance, Performance Analysis for App Builder alerts you if a component contains:
- External CSS
- Unminified JavaScript
- A use of lightning:recordEditForm
- A use of layoutType=”FULL”
- A use of lightning:tabFocused listeners

- To help you improve page performance, Performance Analysis for App Builder alerts you if a component contains:
- Salesforce Flow Enhancements: – There are several enhancements in Salesforce Flow as follows:
- Connect a Record-Triggered Flow to an External System Using an Asynchronous Path: – Finally, you can use a record-triggered flow to integrate with an external system and update external objects—without writing any code. Add an asynchronous path that runs after the original transaction for the triggering record is successfully committed. Now your record-triggered flows can perform actions that were previously limited by transaction boundaries. For example, use an asynchronous path to post a message to Slack, update a record in Heroku, or place an order using a third-party fulfillment system. Both asynchronous and scheduled paths are subject to the same asynchronous per-transaction Apex limits.

- Send an Outbound Message from Your Record-Triggered Flow: – Outbound messages are available as a core action in Flow Builder. Send a SOAP message from a record-triggered flow to a designated endpoint. For example, notify an external service when a high-priority case is created. Perhaps you used outbound message actions with workflow rules and approval processes. Now outbound message actions are available for record-triggered flows that run after the record is saved.

- Connect to More Elements Across the Auto-Layout Canvas (Beta): – In Auto-Layout, you can now connect to elements that don’t follow the usual consecutive auto-layout paths. Use the new Go To connector to connect an element to any other element except an End element. Because Auto-Layout now supports certain non-consecutive paths, you can use it to work on more of your flows.
- To connect to an element that isn’t next on the auto-layout path, click
 on the connector that you want to change, and then select Connect to element
- To finish creating the Go To connector, click
 in the element that you want to connect.
- To connect to an element that isn’t next on the auto-layout path, click
- Roll Back Pending Record Changes When a Flow Element Fails at Run Time: – To roll back a transaction and cancel all its pending record changes in a screen flow, add the new Roll Back Records element in a fault path. Previously, when a transaction ended, its pending record changes were saved to the database even if a flow element failed in the transaction.

- Change Record Field Values Temporarily While Debugging: – Busy testing your record-triggered flows? Now, when you debug record updates, you can update field values in the Debug flow window. No need to go back to a record and make updates there. You can even debug entry conditions and decision outcomes that use the Is Changed operator to determine whether a flow will run when certain field values on the record change.

- Send Email Notifications for Every Automated Field Update: – Send email notifications each time a workflow rule, process, or Apex trigger updates the same record that triggered the automation. When you choose to notify users after operations, such as assigning a task, configure the new process automation setting to send the email notifications. Previously, a workflow rule, process, or Apex trigger suppressed email notifications for updates to the same record that triggered the automation. A previously released update required that you contact Salesforce Customer Support to stop suppressing email notifications. You can now use this new setting to stop suppressing email notifications.
- From Setup in Lightning Experience, in the Quick Find box, enter Process, and then select Process Automation Settings. On the process automation settings page, select Send an email each time automation updates the same record.
- Set Up Flow Screen Choice Options with Fewer Clicks: – Now it is easier to create standalone choice options as you configure choice components, and reduce the number of clicks it takes to configure a choice component.

- Call Another Flow from a Record-Triggered Flow Using a Subflow Element: – Subflow elements are now available for record-triggered flows that run after a record is saved or before a record is deleted. Now you can break your automation into building blocks and reduce the complexity of a flow. From within a flow, call another reusable flow to perform a common task. For example, when you create an opportunity, call an autolaunched flow that determines which region to assign the opportunity to.
- Connect a Record-Triggered Flow to an External System Using an Asynchronous Path: – Finally, you can use a record-triggered flow to integrate with an external system and update external objects—without writing any code. Add an asynchronous path that runs after the original transaction for the triggering record is successfully committed. Now your record-triggered flows can perform actions that were previously limited by transaction boundaries. For example, use an asynchronous path to post a message to Slack, update a record in Heroku, or place an order using a third-party fulfillment system. Both asynchronous and scheduled paths are subject to the same asynchronous per-transaction Apex limits.
- Dynamically Add Content to Your LWR Sites with Data Binding in LWC Components: – Use data binding to quickly select content to dynamically populate your LWR sites. Save your content one time and use it anywhere. Create content that matches your branding and messaging, save it in your Salesforce CMS, and then use it on any LWR site. Use the Banner or Tile components to automagically populate content from Salesforce CMS.
- Call Invocable Actions from Apex (Developer Preview): – Invocable.Action is a new Apex class that allows you to call invocable actions from Apex code. For the developer preview, this feature is available only in scratch orgs.To enable this feature in your scratch org, add a reference to
CallIAFromApexin the project-scratch-def.json file in your SFDX project{ "orgName": "my company", "edition": "Developer", "features": [ "CallIAFromApex" ], "settings": { ... } }After you’ve added to your scratch org definition file, reference Invocable.Action in your Apex code. This example uses the standard invocable action “chatterPost” to post a message to the current user’s feed.
Invocable.Action action = Invocable.Action.createStandardAction('chatterPost'); action.setInvocationParameter('text', 'This is a test.'); action.setInvocationParameter('type', 'User'); action.setInvocationParameter('subjectNameOrId', UserInfo.getUserId()); List<Invocable.Action.Result> results = action.invoke(); if (results.size() > 0 && results[0].isSuccess()) { System.debug('Created feed item with ID: ' + results[0].getOutputParameters().get('feedItemId')); } - Use the valueOf() Enum Method to Convert a Specified String to an Enum Constant Value: – The
valueOf()enum method converts a specified string to an enum constant value. An exception is thrown if the input string doesn’t match an enum value. In previous releases, using this method resulted in a runtime error.You can use the method for both system and user-defined enums. This example uses the method to convert a string to a known season enum value.public enum Season {WINTER, SPRING, SUMMER, FALL} string currentSeasonInput = 'winter'; Season currentSeason = Season.valueOf(currentSeasonInput); - Use Mock Responses to Test Salesforce Functions: – Apex now supports mock testing of Salesforce Functions. Use the existing Test.setMock() method with the new FunctionInvokeMock interface and MockFunctionInvocationFactory class methods to mock test Salesforce Functions. You can read about it here.
- Simplify Package Development by Creating and Specifying an Org Shape – If your package’s metadata depends on a complex set of features, settings, or licenses, it can be difficult to declaratively specify these dependencies in a scratch org definition file. Instead, create an org shape of your production org, or another development org, and specify that source org’s ID in your scratch org definition file. During package creation, we mimic the source org’s environment when we build and validate your package’s metadata.
- Org Shape for Scratch Orgs is a beta feature. It doesn’t currently include every feature, setting, and limit. In these cases, you must manually specify these features and settings in your scratch org definition file. Before using this feature, get familiar with how Org Shape for Scratch Orgs works. Then enable the scratch org setting in your source org, generate the org shape, and edit your scratch org definition file to include the org name and 15-character source org ID.
{
  "orgName": "Acme",
  "sourceOrg": "00DB1230400Ifx5"
}
- Org Shape for Scratch Orgs is a beta feature. It doesn’t currently include every feature, setting, and limit. In these cases, you must manually specify these features and settings in your scratch org definition file. Before using this feature, get familiar with how Org Shape for Scratch Orgs works. Then enable the scratch org setting in your source org, generate the org shape, and edit your scratch org definition file to include the org name and 15-character source org ID.
- Filter Your Stream of Platform Events with Channels (Pilot) – Receive only the event messages that match a predefined filter on a custom channel. Create a channel and configure it with a complex filter. CometD subscribers to the channel receive a filtered stream of events. With fewer events delivered to subscribers, event processing is optimized. Also, CometD subscribers can make more efficient use of the event delivery allocation. You can read about it here.


Additional enhancements worth noting!
- Associate Errors with the Right Lightning Components for Screen Readers: – You can now associate a custom component’s error element with an input component. When you build a new custom component for a flow, set an ID for the error element so that a screen reader can read the error message text that describes the custom component. For example, you’re building a custom component that searches through a to-do list. You want to make sure that screen readers properly associate errors with the to-do list component.
- Add input validation to a custom component so that it lets the flow know whether the component is valid. If the custom component is invalid, the flow displays an error message below the custom component. The flow passes the ID of the element that displays the error message to a property called
ariaDescribedByin the custom component. The component receives the updatedariaDescribedByproperty and assigns the ID to the appropriate input component that has its ownariaDescribedByproperty. As a result, the error gets associated with the custom component’s input property.
- Add input validation to a custom component so that it lets the flow know whether the component is valid. If the custom component is invalid, the flow displays an error message below the custom component. The flow passes the ID of the element that displays the error message to a property called
- View Dependencies for Lightning Web Components: – Use the dependencies tree viewer to see which custom components and Apex classes that a Lightning web component uses. You can quickly see the structure of a component and navigate to the source for its dependencies.
- From Setup in Lightning Experience, in the Quick Find box, enter Lightning Component, and then select Lightning Component.
- To see its dependencies on the detail page, select a Lightning web component.
- To see the details for one of the dependencies, click a link in the Name column.

- Unlock the Power of External Services in Einstein Bot Builder: – Use External Services in more parts of the Salesforce Platform! Integrating your Einstein bot with an external service is now as easy as adding an action to a Bot Builder dialog. You can add an external service’s action to your bot from the Bot Builder. Previously, you could only add an external service’s action to your bot via a flow.
- Use External Services for MuleSoft to Generate Actions (Generally Available): – Import your MuleSoft Anypoint Platform APIs in a few clicks with External Services for MuleSoft. Select your MuleSoft named credentials, and let Salesforce do the heavy lifting of importing your endpoints and converting them into actions. Salesforce automatically gets the list of APIs available to your MuleSoft account across all your environments. Previously, you manually exported your Open API 2.0 specifications from MuleSoft and imported them into an external service. This export process can lead to validation errors when you created the actions in Salesforce.
- Specify a Language for Email and SMS Messages When Using initSelfRegistration: – When you’re using Apex to manage identity verification for Experience Cloud sites, guarantee that self-registration verification messages are sent in the correct language. The initSelfRegistration method now detects the user’s language through the User object. Use the LanguageLocaleKey field on the User object to specify a language for email and SMS verification messages. Previously, the method determined the user’s language through request parameters, cookies, or the user’s browser.
- Put Territory Assignment Rules on Pause: – To prevent performance issues, keep assignment rules from running during account inserts. You can run the assignment rules after the insert job is finished.

- Set Organization-Wide Sharing for Products (Release Update): – To better protect your Salesforce data, this update adds org-wide sharing settings for product records. As of Spring’22, in new orgs only, the update will set the org-wide sharing default for products to Private for external users. Sharing rules and manual sharing aren’t supported. This update was first made available in Winter’22.
- Retention Policy Now Associated with Only One Custom Object: – Previously, a retention policy could be associated with both the custom object that you explicitly set it for and another custom object with a similar key prefix. This behavior no longer happens. This changes is only applicable to customers who purchased a Salesforce Shield or Salesforce Field Audit Trail add-on subscription.
- Create Alerts for Changes to Your Security Configuration: – Automate security monitoring by setting up in-app and email alerts for conditions of your choosing. Indicate what changes you want to be alerted of, how you want to be alerted, and who receives the alert. This change is available to customers who purchase Security Center and Event Monitoring add-on subscriptions.

- Route Messaging Sessions with Omni-Channel Flows (Beta):– With the help of Flow Builder’s power and flexibility, define your routing rules to dynamically route messaging sessions. In addition to routing to queues or skills, Omni-Channel flows allow you to develop a more personal relationship with your customers by routing sessions directly to agents, such as the account owners.
- Limit for Number of Actions in a Boxcar Request Was Added:– The Lightning Component framework now returns a 413 HTTP response status code if there are more than 2,500 actions in a boxcar request. Previously, there was no limit and a request with a larger number of actions was rare but led to a slow response time. If a user sees this error, consider redesigning your custom component to follow best practices and reduce the number of actions in a request.
- Supercharge Scheduled Paths with Enhancements for Minutes, Batching, and Limits – Now you can specify in minutes the time that you want a scheduled path to run. You can also set a batch size to improve performance and avoid hitting Apex governor limits. And now the less restrictive asynchronous limits apply to scheduled paths, making it easier to complete complex operations without hitting limits.

- And to help avoid hitting a per-transaction Apex limit with a scheduled path, now you can specify a batch size for it. The batch size is the number of records that a path can process at the same time. The default and maximum value is 200, and the minimum is 1. For example, if you specify a batch size of two and seven records are scheduled to be processed in the same time interval, Flow Builder groups them into four batches.
- Scheduled paths and asynchronous paths are batched differently. In a scheduled path, all the records that meet the conditions and are scheduled to be processed in the same minute are grouped up to the batch size into one batch.
- In an asynchronous path, a set of records is always processed together in one batch and never combined with other records. For example, if 20 accounts are updated in a single update operation, those same 20 accounts are processed in one batch.
- Enjoy a Streamlined Trigger Setup Experience in Flow Builder:– The process now follows the order that most admins expect. Select the triggering object, configure the trigger, set entry conditions, and choose how best to optimize your flow—all within a single window.

- Some Flow Screen Components Rebuilt Using LWC: – These Salesforce-provided screen components were rebuilt: Address, Display Text, Email, Long Text Area, Slider, and Toggle. Now screen readers can read the labels associated with those components. The components are also easier for Salesforce to support in all the places that can run screen flows. With a few exceptions, the rebuilt screen components look and behave the same as in previous releases.
- For each rebuilt component that’s configured to validate user input, the error message appears when the user shifts the focus to another screen component. Previously, the error message appeared when users navigated away from the flow screen.
- For each rebuilt component that’s configured to provide help, the help text appears in a popover. Previously, the help text appeared in a separate window.

- For the Display Text component:
- Text indentation now works. Previously, if you clicked
 to indent some text, the text wasn’t indented at run time.
 - The HTML tag <dfn> is no longer supported. At run time, content inside a <dfn
>tag is displayed without any special styling. - The HTML tag <bdo> is no longer supported. At run time, content inside a <bdo> tag is displayed but doesn’t override the base direction of text on the page. For example, if the page’s text direction is left to right, content inside a <bdo>tag is no longer changed to go right to left.
- Text indentation now works. Previously, if you clicked
- Debug Scheduled Paths in Record-Triggered Flows:– We added paths to the list of debugging enhancements for record-triggered flows. You can debug a scheduled path, a path that runs immediately, or a path that runs asynchronously.

- Choose More Options When You Debug a Flow:– When you debug a flow, you now see element labels in Flow Builder and in flow error emails. In Flow Builder, choose whether to show element API names and expand or collapse debug details. Previously, element API names always appeared. In Flow Builder, all debug details always appeared.
- In Flow Builder, expand all debug details or show the element API names or both. When you select preferences, the number of selected preferences appears instead of the preference labels.

- By default, the debug details are collapsed and show element labels.

- If an error occurs for an element, the debug details for that element are expanded. If the flow executes a Pause element, the pause configuration is shown.
- When a flow interview resumes, Salesforce now show the Resume heading. Previously, no heading appeared.

- In Flow Builder, expand all debug details or show the element API names or both. When you select preferences, the number of selected preferences appears instead of the preference labels.
- Bid Farewell to Run Flows for Guest Users: – The Run Flows permission for the Guest User and Experience Cloud External User profiles is no longer available in new orgs, starting in Winter’21. Without the Run Flows permission, you’re free to use the more granular permission structure embedded in Flows and give your users the detailed access they need. Run Flows will be removed from all orgs in the Summer’22 release. To avoid future access issues, we recommend updating your existing sites to the new permission structure before the Summer’22 release.
- View All Triggering Objects and Platform Events for Triggered Flows:– The new Triggered Flows list view shows the object or platform event that triggers each flow. Previously, you opened a flow in Flow Builder to view the triggering object or platform event. Now, before you save or delete a batch of records, you can quickly check whether your changes trigger a flow. You can add the new Triggering Object or Platform Event Label column to an editable list view on the Flows page in Setup.

- Reset Screen Components to Admin-Configured Defaults When Making Hidden Components Visible:– When a user navigates back to a screen where a component was hidden and makes the component visible, the component now resets to use the admin-configured input values. This change applies to most standard components, including Toggle, Dependent Picklist, Lookup, Email, Name, Address, Phone, URL, and File Upload, and all custom components.
- In API version 52.0 and earlier, the hidden component on the previous screen would sometimes not work as expected or show an error message. This issue occurred after the user navigated back to that screen and interacted with other components that made the hidden component visible.
- For example, when a Toggle component was made visible again, the component reverted to the default labels defined in the underlying component. The labels changed to Toggle, Active, and Inactive rather than the default labels set by the admin. When a Dependent Picklist component was made visible again, the component rendered as a blank picklist with no inputs and showed an error message.
- Check for Null Record Variables or Null Values of Lookup Relationship Fields in Process and Flow Formulas (Release Update):– This update enables process and flow formulas to reference a record’s field when the field is accessed via a null lookup relationship field or null record variable. Now process and flow formulas can return null values when the calculations involve a null record variable or null lookup relationship field. This update was first made available in Spring’19. This update was enabled in Salesforce orgs that received Summer’20 before July 10, 2020. If this is true for your org and you disabled the update, you must enable it in Spring’22. In Spring’21, Salesforce enabled the test run option for this update because of a known issue with the scheduled enforcement. You can still disable the test run until the update is enforced in Spring’22.


Salesforce Mobile App Enhancements
Salesforce performs automated and manual testing of the Salesforce mobile app for iOS and Android on a select set of mobile devices. This is the list of devices for Winter’22.
Platform | Phones | Tablets |
Android |
|
|
iOS |
|
|

- Help Your Users Personalize Their Content With Mobile Home (Generally Available): – Mobile Home is generally available as a standard navigation item for the Salesforce mobile app on iOS and Android. Mobile Home is a landing page that your end users can personalize with the content they care about most. As an admin, you can add Mobile Home to any phone-activated Lightning app, or to the Mobile Only navigation, the same way you customize any other navigation tab. After it’s added, the Mobile Home tab appears only on users’ mobile devices and doesn’t show up on desktop. Set it as the first tab and your mobile users have a brand new landing screen every time they open the app.

- Protect Your Data with Enhanced Mobile Security Updates : – More protection has been built into the enhanced mobile security for the Salesforce mobile app. You can now enforce new policies such enforcing certificate pinning (iOS only). If a user tries to use the app and the server’s certificate doesn’t match the expected value, a secure connection won’t be established. These new policies further secure your Salesforce app data and users’ personal data.
- In Setup, search for Mobile Security and select Mobile Security. Click the toggle switch to enable logging certificate pinning.
- Authentication Server Certificate Pinning: Certificate pinning for the authentication server URLs where the user provides credentials
to log in. - Resource Certificate Pinning: Certificate pinning for the resource URLs used by the app to fetch data for the user.

- Authentication Server Certificate Pinning: Certificate pinning for the authentication server URLs where the user provides credentials
- In Setup, search for Mobile Security and select Mobile Security. Click the toggle switch to enable logging certificate pinning.
- Limited Access for New Users with Community Licenses:- For new Salesforce orgs created after the Winter‘22 release, users with community licenses can’t log in to the Salesforce mobile app. When they open the Salesforce mobile app, these users see a blocking screen with this message: Your license does not include access to the mobile app. Please contact your administrator. Because app features and functionalities aren’t available to these users, they’re better served through the browser experience. Community users in orgs created before Winter’22 aren’t affected by this change.
- Run Your Business on Tablets (Beta): – The new full-width tablet app experience is now available in the Salesforce mobile app on iPad and Android tablets as an administrator opt-in beta feature. This experience uses the tablet’s full screen to display desktop record layouts with mobile optimized components. In addition, it supports Lightning apps, full-width Lightning record pages, Lightning navigation, and Einstein Analytics.

- To turn on the full-width Lightning on tablet experience, from Setup, search for Quickstart and select New Salesforce Mobile App Quickstart. Under Tablet Preferences, select Lightning on tablet: full-width (Beta).
- The full-width tablet experience is offered as a part of an opt-in beta and has some known limitations.
- Briefcase Builder: – Explore a better way to make offline record data available to your users with Briefcase Builder. Briefcase Builder helps you select records to share offline with Field Service workers by efficiently narrowing down record data based on the users, groups, and connected apps that you select. Now you can create an offline platform experience that is flexible, easy to use, and responsive to your mobile workers’ needs.

- Take Advantage of the Salesforce Mobile App Defaulting to Lightning Apps:- The Salesforce mobile app now defaults to a phone-activated Lightning app if one is available to the user. Previously, all users landed on a Mobile Only app navigation, and they could switch to a different Lightning app using the App Launcher from the Menu tab. The Salesforce mobile app now selects the first available Lightning app by default—instead of Mobile Only—which results in a change to the app’s bottom navigation bar. Users who don’t have access to any phone-activated Lightning apps still default to Mobile Only.


